مصراوي للإلكترونيات وخدمات الصيانة
هل تريد التفاعل مع هذه المساهمة؟ كل ما عليك هو إنشاء حساب جديد ببضع خطوات أو تسجيل الدخول للمتابعة.
مصراوي للإلكترونيات وخدمات الصيانة

lcd,tv,رسيفر,تليفزيون,شاشه,كمبيوتر,سوفت,برامج,بلازما.توشيبا,شحن فلاشه,


أهلا وسهلا بك زائرنا الكريم, أنت لم تقم بتسجيل الدخول بعد! يشرفنا أن تقوم بالدخول أو التسجيل إذا رغبت بالمشاركة في المنتدى

أعطال تم إصلاحها وأهم المشاركات بالقسم

2 مشترك

اذهب الى الأسفل  رسالة [صفحة 1 من اصل 1]

م/حسن المصري

م/حسن المصري
المدير العام


أعطال تم إصلاحها وأهم المشاركات بالقسم  268285
أعطال تم إصلاحها وأهم المشاركات بالقسم  704281
إن شاء الله سيكون هذا القسم للسرفس الخاص بكل أنواع LCD
نرجوا من الأخوة عدم الرد
بالشكر والمجاملات ونجعل هذه الصفحة للسرفس فقط من عنده معلومة عن سرفس
معين لأى جهاز أن يضعها هنا مشكورا فى هذا القسم ونتعاون معا على بركة
الله


هذه المعلومات نقلا عن إحدى المواقع
الأجنبية ونتمنى المشاركة من الجميع من عنده معلومة معينة عن سرفس معين لأى
جهاز أن يضعها هنا

تحياتى للجميع


PHILIPS

Log into the service menu :
# c is rapidly gaining remote 062596i (i- button "info",)
# window appears with a warning in English.
Warning: Access only to employees of
service centers.
Unauthorized access may terminate the guarantee of your TV.
# Do you want to go - simply press the Menu button on the remote .
Exiting the Menu - click the red button on the remote.
Useful information
1. hours worked . SM -> Operation hours
2. type matrix. SM -> Options -> Display -> Screen
# 062. LCD LPL WX5 SLB1 32 ". LPL - native filipsovskaya matrix. The
most desirable option.

TOSHIBA

Log into the service menu :
# Turn on TV and press the MUTE button on the remote . Further MENU on
the TV casing and simultaneously MUTE on the remote.
# press the " 9 " once and see the top line on time.
# pressing " 9 " several times looking type of matrix .
# Press the AV input call splash of blue, red and green colors.
Warning: Press "2" do not press in any
case ! (reason not specified, but unconfirmed reports included
calibration mode, white)
Exit - turn off TV -click " Network. "

SAMSUNG

Log into the service menu :
For all LCD and PDP TV in Europe - a way to enter the Service Menu is
universal
When TV is turned off rapidly and continuously press on the remote
control keys INFO - MENU - MUTE - POWER
TV less than 25 " sometimes works the American way MUTE
- 1 - 8 - 2 - POWER

Log in Service Menu possible only at very
high speed pressing all the buttons for 1-2 seconds.
# Move - Enter - enter the submenu , Menu - access to the upper level,
up / down - move .
# How to change - think a hundred times , save the settings that were -
they are not restored by Reset, left / right - change
Warning: Do not enter the Calibrate and
Reset in general, if you do not know why you need it !
# Exit - turn off the TV .
To enter the Advanced Menu - Dial 0000.
Immediately prepare to re- issuing all the custom settings - they will
be exposed by default.
# In the engineering menus Panel On Time (Hour) - time between panels.
What can change or adjust in Service Menu?
# Option table is responsible for the overall configuration of the
entrance and the telly does not depend on !
# Dimm Type / Type - Information about the matrix .
# Ready responsible for the DTV tuner (OFF - enabled , ON - OFF)
# Shop Mode - enables or disables the magazine mode.
# Adjust - after 2008, hid in the Advanced Menu.
# Video Mute Time - Reduce the value for the quickening of channel
switching .

SHARP

Log into the service menu :
# Click on MENU button
# We go to the audio settings .
# Later in the balance
# Rapidly gaining on the remote control -> 0532
# TV dolzhekn go to sevisny mode.
# To exit the SM press the " network " on the remote.

2nd version of the entrance to the service menu :

# TV must be switched off.
# Press and hold the "VOLUME -" and "MENU" on the TV and turn it
on the button "ON / OFF".
Button "VOLUME -" and "MENU" do not let until TV lights up the screen.
In the upper left corner should be lighted sign.
# Press the buttons simultaneously "PR-" and "MENU".
# Further navigation panel.
To exit the service menu to turn off the TV button "ON / OFF" on the
TV.

# Press and hold the "VOLUME -" and "MENU" on the TV switch on
the TV button "ON / OFF".
Button "VOLUME -" and "MENU" do not let until TV lights up the screen.

The third version of the entrance to the service
menu :

# Turn off the TV button "Power"
# Push the TV button, "Vol -" and "INPUT"
# Hold them turn on the TV . In the left corner appear bukvochki .
To exit the service menu to turn off the TV button "ON / OFF" on the
TV.

# Press and hold the "VOLUME -" and "INPUT" on the TV switch on
the TV button "ON / OFF".
Button "VOLUME -" and "INPUT" not to let TV do not shine until the
screen


عدل سابقا من قبل م/حسن المصري في الثلاثاء 21 ديسمبر - 21:58 عدل 2 مرات

https://eioe.forum.st

م/حسن المصري

م/حسن المصري
المدير العام


Login Factory
Service Mode: BenQ Lcd Monitor


أعطال تم إصلاحها وأهم المشاركات بالقسم  Benq%20lcd%20monitor%20factory%20service%20mode%201

a) The Older and latest version of BenQ LCD Monitor have diference
method
to login factory service mode. The older version login method is: Press
and hold the "MENU" & EXIT" button, then press "POWER" button to on
the lcd monitor.

أعطال تم إصلاحها وأهم المشاركات بالقسم  Dell%20lcd%20monitor%20factory%20service%20mode%202

b) After on lcd monitor, you need to press "i" button, now you can login
to their factory service mode.

أعطال تم إصلاحها وأهم المشاركات بالقسم  Benq%20lcd%20monitor%20factory%20service%20mode%203

c) We can look at the above photo, the early or older benq lcd monitor,
they only have a little information on it. They just show the white
balance functinon on factory service mode for adjustment only.

أعطال تم إصلاحها وأهم المشاركات بالقسم  Benq%20lcd%20monitor%20factory%20service%20mode%204

d) The new model of BenQ lcd monitor, their login factory service mode
method are difference from the early model lcd monitor. Firstly, press
The "POWER", "SELECT" and "MENU" button at the same time.
After on lcd monitor, press the "v" button, now you can login to the
factory service mode.

أعطال تم إصلاحها وأهم المشاركات بالقسم  Benq%20lcd%20monitor%20factory%20service%20mode%205

e) The above photo is factory service mode for BenQ FP241WZ lcd monitor.
Bottom of the photo have show out their manufacturer time and lcd panel
part number.


عدل سابقا من قبل م/حسن المصري في الثلاثاء 21 ديسمبر - 21:53 عدل 1 مرات

https://eioe.forum.st

م/حسن المصري

م/حسن المصري
المدير العام


Sony TV Service Menu Code


Plasma / LCD / CRT / RPTV :

# Using the remote control:
# Turn the TV off.
# Press {DISPLAY} {5} {VOL+} {POWER ON} buttons.
or
Press {DISPLAY} {5} {POWER ON} buttons.
# The Service Menu will be displayed.
# Use numbers {1} and {4} to select the item to adjust.
# Use numbers {3} and {6} to adjust the value of the data.
# Press {MUTE} then {ENTER} to save new settings.
# The words "WRITE" in red will show up in the upper right corner if
saved.
# Turn the TV off to exit the service menu.


PROJECTORS :

* Service Menu :
* Using the remote control
* Press {ENTER} {ENTER} {UP ARROW} {DOWN ARROW} {ENTER}.
* Then {UP ARROW} when it asks: "Do you want to enter the Service
mode?".

* Factory Mode :
* Using the remote control
* Press {ENTER} {ENTER} {LEFT ARROW} {ENTER}.
* Then {UP ARROW} when it asks: "Do you want to enter the Factory
Mode?".
* Any additional menus usually pop up under the main INFORMATION menu.


Service Menu Key Sequence:

* Access "Menu" and make sure "Status" is On.
* Exit the "Menu".

* Service Menu :
* Using the remote control
* Press {ENTER} {ENTER} {UP ARROW} {DOWN ARROW} {ENTER}.
* Select "Yes" when it asks: "Do you want to enter the Service Mode?".

* Factory Mode :
* Using the remote control
* Press {ENTER} {ENTER} {LEFT ARROW} {ENTER}.
* Select "Yes" when it asks: "Do you want to enter the Factory Mode

https://eioe.forum.st

م/حسن المصري

م/حسن المصري
المدير العام


Viewsonic LCD Monitor


أعطال تم إصلاحها وأهم المشاركات بالقسم  Viewsonic%20lcd%20monitor%20factory%20service%20mode%201

a) Before on lcd monitor, press and hold the "2" button then on the
lcd monitor power.

أعطال تم إصلاحها وأهم المشاركات بالقسم  Viewsonic%20lcd%20monitor%20factory%20service%20mode%202

b) After on lcd monitor, press "1" to open the osd menu.

أعطال تم إصلاحها وأهم المشاركات بالقسم  Viewsonic%20lcd%20monitor%20factory%20service%20mode%203

c) Now, you can see bottom of the menu extra more one selection for
"Factory Menu".

أعطال تم إصلاحها وأهم المشاركات بالقسم  Viewsonic%20lcd%20monitor%20factory%20service%20mode%204

d) Press the "2" button, you can login to the factory service mode.

أعطال تم إصلاحها وأهم المشاركات بالقسم  Viewsonic%20lcd%20monitor%20factory%20service%20mode%205
e) The information of Viewsonic LCD Monitor factory service mode.


عدل سابقا من قبل م/حسن المصري في الثلاثاء 21 ديسمبر - 21:53 عدل 1 مرات

https://eioe.forum.st

م/حسن المصري

م/حسن المصري
المدير العام


LG Lcd Monitor


Before on the lcd monitor, you need to press and hold the "MENU" button,
then press "POWER" to on the monitor. Press "MENU" button to open the
osd menu, at the bottom of menu, you can see a new selection to go into
the factory service mode.

أعطال تم إصلاحها وأهم المشاركات بالقسم  LG%20lcd%20monitor%20factory%20service%20mode%201

a) Press and hold the "MENU" button, then on the monitor.

أعطال تم إصلاحها وأهم المشاركات بالقسم  LG%20lcd%20monitor%20factory%20service%20mode%202

b) Now you need to press the "MENU" button, then you can login to
factory service mode.

أعطال تم إصلاحها وأهم المشاركات بالقسم  LG%20lcd%20monitor%20factory%20service%20mode%203

c) The LG LCD Monitor factory service mode screen shot. Inside the
factory service mode, you got some useful information like, product
model, manufacturer date, F-ENGINE chipset version, lcd panel number and
etc

https://eioe.forum.st

م/حسن المصري

م/حسن المصري
المدير العام


sony
bravia


أعطال تم إصلاحها وأهم المشاركات بالقسم  Qariya-8070720c7b

https://eioe.forum.st

م/حسن المصري

م/حسن المصري
المدير العام


TOSHIBA
42AV633DR

حمل من
هنا

https://eioe.forum.st

م/حسن المصري

م/حسن المصري
المدير العام


SONY BRAVIA KDL 32L4000


أعطال تم إصلاحها وأهم المشاركات بالقسم  2lsi0yf


الموديل ده من برافيا مختلف شوية ....
علشان كدة قلت اجيبه للإستفادة


عدل سابقا من قبل م/حسن المصري في الثلاثاء 21 ديسمبر - 21:54 عدل 1 مرات

https://eioe.forum.st

م/حسن المصري

م/حسن المصري
المدير العام


menu service LCD
Philips


وكدالك بالفرنسية للاخوة المغاربة


code pour rentrer dans le menu
service

par contre ta
reference est inconnu chez philips il existe 2 code

tapez a
l'aide de la telecommande

la sequence 0 6 2 5 9 6 puis la touche
OSD

( un carre avec un I+]
..................................................
..
ou tapez a l'aide de la telecommande

la sequence 1 2 3 6
5 4 une mire apparaitra ensuite

tu arrivera dans le menu
service


عدل سابقا من قبل م/حسن المصري في الثلاثاء 21 ديسمبر - 22:00 عدل 1 مرات

https://eioe.forum.st

م/حسن المصري

م/حسن المصري
المدير العام


HISENSE SERVICE MODE

أعطال تم إصلاحها وأهم المشاركات بالقسم  Qariya-2c6883fa56

https://eioe.forum.st

م/حسن المصري

م/حسن المصري
المدير العام


How to
update the software, the scheme links the program


In devices assembled on
processors MStar an 8-pin ISP FLASH. Many programmers support it, but
then the question arises vypayke her search for the panels, or
napaivaniya wires. I want to share with you, dear users of the portal,
the method of in-system programming (as well as reading) ISP FLASH. this
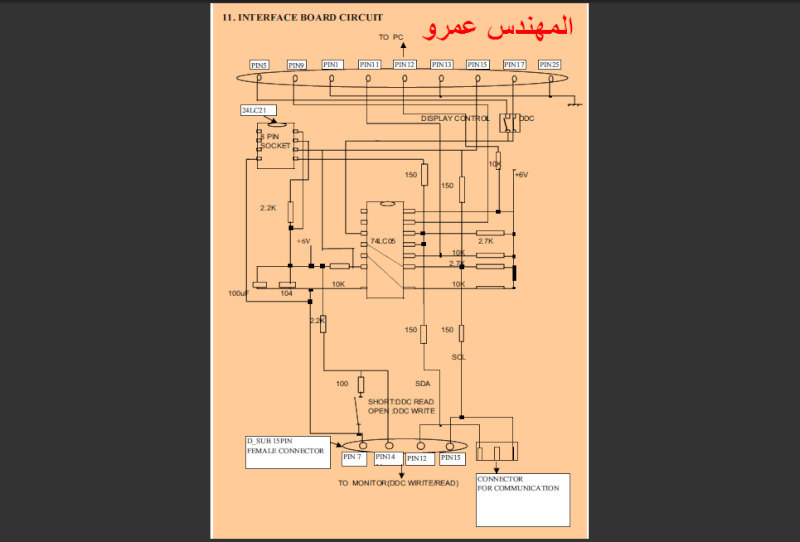
will require a program or ISP TOOL ISP Writer (same), a simple jig for
74HC05 (approximate shemku attached), and a little patience. I use a jig
kindly provided by PANASONIC, called Singie Master IIC-INTERFACE.
Familiar used samsungovsky MTI-2059, also worked. Usually on a special
apparatus. connector for programming, and when you receive the unit I am
assembling a small perehodnichek from my jigs to this unit and each
sign, in order not to be distracted by desoldering. the only drawback of
my jig is that it must be powered, as program does not provide recharge
to the LPT (although it is possible that the jig is not soldered).

Begin work needed from the tab Config, it selected the port settings.
there need to configure the port pins under the jig (under my approach
configuration AOC. For another, the jig may have to configure the pins
by hand. After that we press the button Apply. Then you can validate the
configuration of pins Auto Detect button should appear next to the word
OK.
After we press Connect and the program (when properly connected and
configured) shows a window with a specific type of Flash.
To read choose a bookmark LOAD (not READ), choose the path (the button
Load) and we press on the RUN. To select the recording tab READ. In her
chosen path (Book Read) and go to the tab AUTO. It is we press on the
RUN. Begins the process of programming at the end of it appears PASS.
Well, sort of, and all he wanted to say, if they have questions, please
ask here, I hope the moderators do not outsource topic.
That such differences.
But still, I forgot, you can use instead of the 74HC05 its Russian
analogue K555LN2.


https://eioe.forum.st

م/حسن المصري

م/حسن المصري
المدير العام


أعطال تم إصلاحها وأهم المشاركات بالقسم  74ls05_472


أعطال تم إصلاحها وأهم المشاركات بالقسم  _______________________754_132


Estimated shemka dzhiga.jpg

isp_tool.rar


أعطال تم إصلاحها وأهم المشاركات بالقسم  1h10

changing the potential from the
log.
0 on
the log. 1, in this processor, he succeeded zakonektit it.


أعطال تم إصلاحها وأهم المشاركات بالقسم  1u11


أعطال تم إصلاحها وأهم المشاركات بالقسم  2h10

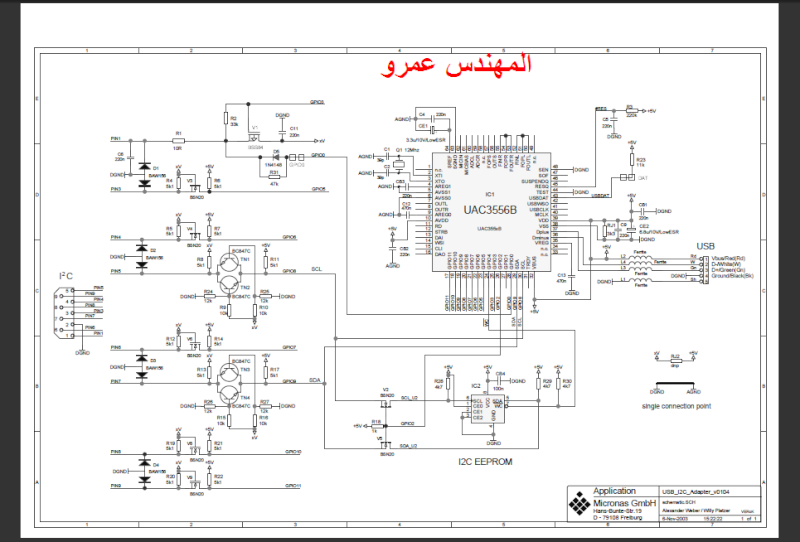
Continuing the theme MICRONAS
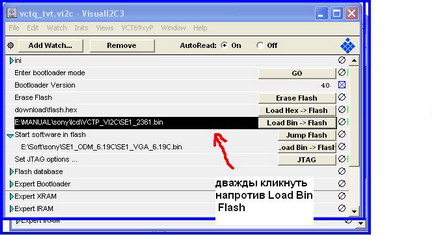
Program Visual I2C allows both write and read the firmware.
Here is a description of plum proshivy:
1.Proizvesti standard connection TV, computer with JIG.
2.Otkryt program Visual I2C. Double-click on Add Watch

3. Line Name specify the path and name for the driver that saves.
4. In paragraphs Address must be set
From 0x0
To to flash 256K-0h3ffff
to flash 512K-0h7ffff
for firmware 1M-0xfffff
5. Unveiling the Watch select Save Bin (can be in HEX, but as it has
already agreed to maintain BIN)
6. Then click the OK button. In the program a button Save Flash-BIN. we
press on it, begins the process of draining the firmware.
7. For each sink must specify the path and name of the firmware,
otherwise it will be rewritten merged before.


أعطال تم إصلاحها وأهم المشاركات بالقسم  2u11

أعطال تم إصلاحها وأهم المشاركات بالقسم  3h10


أعطال تم إصلاحها وأهم المشاركات بالقسم  4h10

With regard to - MtkTool
!!!!!!!!

Reads and writes with a 3 meter COM-Extension, without entering the
service!!
Version-mtktool_2_1_.42.12_202, is that the Chinese (on the forum it
is).


mtktool_2_1_.42.12_202.rar

منقول

https://eioe.forum.st

م/حسن المصري

م/حسن المصري
المدير العام


Continuing the theme spread seal jig on the 74HC05. Handkerchief
excellent climbs into the body of LPT port.
M / s. soldered by the assembly, made for that, would later replace it
with a SMD package.

أعطال تم إصلاحها وأهم المشاركات بالقسم  32_424


Signet jig on the 74HC05
LAYOUT.rar


Processors firm WINBOND
(W79E632, etc.) also have in their composition ISP FLASH. Flash is built
into the processor, but as far as I know it can be assumed to record it
the programmer, but not all programmers support them. They are
programmed using a free utility ISP Writer. The documentation on it in
detail the programming procedure and necessary for its execution
hardware. Utility-oriented work under Windows operating system and
allows to reprogram a microcontroller via RS-232 interface using a
simple adapter based driver interface MAX232. The only drawback is that
it is necessary to translate the programming processor mode DEBUG (ISP)
(such as TVs, BBK, collected on this processor, you must hold down --/-,
if the device enters programming mode. In other devices directed to the
DEBUG I unfortunately do not know.

Here you can take shemku jig:
[ندعوك للتسجيل في المنتدى أو التعريف بنفسك لمعاينة هذا الرابط]
Here an overview of the entire
family of chips:

[ندعوك للتسجيل في المنتدى أو التعريف بنفسك لمعاينة هذا الرابط]

Here are faced with Processor
SM5964 firm SyncMos. As well as processors WINBOND have inside the
memory, a program and a description can be found here
[ندعوك للتسجيل في المنتدى أو التعريف بنفسك لمعاينة هذا الرابط]
Unfortunately prog does not save the firmware, but in stitching machine
had nothing to and the entrance to the ISP mode, I did not know (MINI
LCD MXJVC kk-845). If someone disposes of information on their
programming spread


https://eioe.forum.st

م/حسن المصري

م/حسن المصري
المدير العام


PROGRAM WinHost_V32A there is a
significant drawback, there is no backup, and without it there is no
value in the prog, you know we have with you in the form of firmware,
firmware is not, and zaimet they can only discharge by using a joint
rabotu.Da even if the security bit is set, then access to write in the
flash will be erased only if the MCU, and even if the program will be a
backup, but it will be worth bit of protection, too, is not and merge!
Booth there hardveyny and software!


But the program itself

IRFWX-A017_C_SyncMOS ISP APN V3.2 (English). Pdf


WinHost_V32A setup.part1.rar

WinHost_V32A setup.part2.rar

WinHost_V32A setup.part3.rar

WinHost_V32A setup.part4.rar


Program for XORO

STK601xISP.rar
I2C_LPT.rar

LARTER, the situation with
WINBOND next in the program provided you are no binary files needed for
raboty.Eto loaders in flash memory size of 4kb LD, after the processor
is transferred to the mode H / W (Boot mode) to work

from the top of the flash memory to be written into the sector LD (flash
size 4kb) loader predostavlyaetsya as a binary file
whose name LDUXXXX, XXXX depends on versii.V latest version of 40910,
there is no backup function, so that few of her prosecutors, attach
1,08.001 version, but instead there is the so-called ld demo.bin, so
that the version 1.08.001 8051 isp writer needed LDU40325.bin


Ldu versions depending on the
version of ISP WRITER.

Winbond 78E65 8051 IspWriter ver 1.08.001.rar
Winbond ISP Version.rar


Processors firm "TOPPO" TP2808
also have in their composition ISP FLASH. Flash is built into the
processor, but as far as I know it can be assumed to record it the
programmer, but not all programmers support them. They are programmed
using a free utility TP280XISPv5. The documentation on it in detail the
programming procedure and necessary for its execution hardware.
Utility-oriented work under Windows operating system and allows to
reprogram a microcontroller via RS-232 interface using a simple adapter
based driver interface MAX232 (I offer apologies for the copied text
LARTER)

The processor architecture is similar to WINBOND (W79E632, etc.)
Log in ISP mode is described in Datasheet
Got a TV with murdered Flash here that I found on this subject
To flash the firmware as well as to have two files WINBOND
where to get them unfortunately do not know.


أعطال تم إصلاحها وأهم المشاركات بالقسم  Max232_195

MAX232ACPE.rar


Signet is. Need to turn the
mirror when you print


MICRONAS.rar

I opened the package Ward in 2007
if the document is created in it, the old version of Ward can not open a
file.

Perekonventiroval in pdf –

PORTMSC.pdf

I decided to continue to deal
with the possibility schitovaniya flash.

In describing HELP ISP has a team of schitovaniyu.
Podkorektirovav boot fail, I was able to merge.
but I don `t know fit this HEX fail as a flash, because a large volume
of silno 22MB.
When you set the team FLASHRead need to ask at what address to start
and a volume of downloads. Trial, I asked to address 00000 and volume
9999999.
It would be nice if Larter, looked to this file.
Only he's a big, where would unload it?

sisp_le.txt


XJDemo
Hardware


عدل سابقا من قبل م/حسن المصري في الثلاثاء 21 ديسمبر - 22:04 عدل 1 مرات

https://eioe.forum.st

م/حسن المصري

م/حسن المصري
المدير العام


هذه شكل واحدة من المبرمجات اليدوية المستخدمة فى هذه
الأمور والروابط السابقة فى الموضوع بها بعض البرامج وأغلبها التى تستخدم
فى عملية السوفت


That's his photo on both sides, they lie volodim, corrected the
mistake with the power to seal
collected from


أعطال تم إصلاحها وأهم المشاركات بالقسم  M110

أعطال تم إصلاحها وأهم المشاركات بالقسم  M210


عدل سابقا من قبل م/حسن المصري في الثلاثاء 21 ديسمبر - 21:55 عدل 1 مرات

https://eioe.forum.st

م/حسن المصري

م/حسن المصري
المدير العام


We all know the
program MtkTool, which stitches
flash memory DVD-player chip based
MTC, based on the fact that the
memory in the housing TSOP-48 on
foot pinouts are identical, then in any
DVD proigravatel chip based
MTC, instead of regular Flash memory, you
can solder a similar chip
and flash it through this chip.

Propose a
simple programmer.

Get on board decoder chip MTK, native
Flash memory vypayat raspoyat and
legs on the IC socket for TSOP-48,
to connect this card to a computer
via an adapter RS232, apply 3.3V
and all the programming is ready.

Are supposed to flash all
flash supported MtkTool.

Here is the list Chipset


During the month of use I popodalis
DVD with chips not MTK with flash
drives:
AT49BV163A
29LV800TA

HY29DL163TT
pierced well, but time will tell.

In
building its programming, I found more and programmer PonyProg to
EEPROM
- 24S02.

Note: some decoder cards are not
enough of a 3.3V to
programming, is still required 2.5 and may be
something else.


أعطال تم إصلاحها وأهم المشاركات بالقسم  100_3186_628_480


أعطال تم إصلاحها وأهم المشاركات بالقسم  100_3192_175_439


List mikroshem.ra

LOG: Start to backup
LOG:
Init Rs232 ...
Log: -------------------------- Method 1
Log:
result --- ManuId: 1F, DevId: C2, DevId2: 90
LOG: Flash name - ATMEL
(AT49F/BV/LV16x (4) (AT)) x16
LOG: Ia? Ao: Sat Jan 10 15:16:57 2009

LOG: Reading ...
LOG: Finished! (10B8)
LOG: end: Sat Jan 10
15:19:59 2009
LOG: Start to backup
LOG: Init Rs232 ...
Log:
-------------------------- Method 1
Log: result --- ManuId: 1F,
DevId: C2, DevId2: 90
LOG: Flash name - ATMEL (AT49F/BV/LV16x (4)
(AT)) x16
LOG: Ia? Ao: Sat Jan 10 15:21:34 2009
LOG: Reading ...

LOG: Finished! (4EB7)
LOG: end: Sat Jan 10 15:24:36 2009
LOG:
Start to backup
LOG: Init Rs232 ...
Log:
-------------------------- Method 1
Log: result --- ManuId: 1F,
DevId: C2, DevId2: 90
LOG: Flash name - ATMEL (AT49F/BV/LV16x (4)
(AT)) x16
LOG: Ia? Ao: Sat Jan 10 15:28:26 2009
LOG: Reading ...

LOG: Finished! (C2A6)
LOG: end: Sat Jan 10 15:31:28 2009
LOG:
Start to backup
LOG: Init Rs232 ...
Log:
-------------------------- Method 1
Log: result --- ManuId: 1F,
DevId: C2, DevId2: 90
LOG: Flash name - ATMEL (AT49F/BV/LV16x (4)
(AT)) x16
LOG: Ia? Ao: Sat Jan 10 15:31:47 2009
LOG: Reading ...

LOG: Finished! (10B8)
LOG: end: Sat Jan 10 15:34:48 2009
LOG:
Start to backup
LOG: Init Rs232 ...
Log:
-------------------------- Method 1
Log: result --- ManuId: 1F,
DevId: C2, DevId2: 90
LOG: Flash name - ATMEL (AT49F/BV/LV16x (4)
(AT)) x16
LOG: Ia? Ao: Sat Jan 10 18:22:18 2009
LOG: Reading ...

LOG: Finished! (10B8)
LOG: end: Sat Jan 10 18:25:19 2009

Not
likely to wheel with this programaterom,
although
the memory determines the kind of right I


AT49BV162AT?


Sash, perhaps
Philips. The scheme is as follows
Program
IAPWriter


أعطال تم إصلاحها وأهم المشاركات بالقسم  ______436


IAPWriter.rar

LoadDriver.rar

TV Erisson 32LS16 manual,
program and
lay out the composition of the evening, at work for the
traffic are.

seems
to have understood the program uses the other
pins in the LPT port

yes
and like this from HPCC but there not.


أعطال تم إصلاحها وأهم المشاركات بالقسم  Q_127

05.rar


عدل سابقا من قبل م/حسن المصري في الثلاثاء 21 ديسمبر - 22:06 عدل 1 مرات

https://eioe.forum.st

م/حسن المصري

م/حسن المصري
المدير العام


Firmware I have not.
From a manual Thomson stitched so either progerom.
7.Analog board software update
Solution 1:
Prepare MTKTOOL UPDATE, update board, serial line.
(1), Connect PC, update board, and J3 on the main board with serial line

(2), Provide the STB +5 V for main board
(3), Open "MtkTool.exe" in MTK TOOL program, and set the parameter as
below picture
(4), Press "Browse" for selecting the SW.
(5), Press "Upgrade" to download the SW. It will be OK when it show
"100%"
(6), After downloading SW, it will be long time for Initializing EEPROM.

Solution 2:
Preparative is same with above.
Set SYSTEM-> FactoryKey on factory MENU to OFF. Connect the device as
below picture.
Update the SW follow solution1-(3) (4), (5), (6)
TCL Multimedia Technology Holdings LTD.

أعطال تم إصلاحها وأهم المشاركات بالقسم  Tttt_189


أعطال تم إصلاحها وأهم المشاركات بالقسم  Ttt_327


The program determines ISP_Tool connection
with jig_tools?

أعطال تم إصلاحها وأهم المشاركات بالقسم  123_102

أعطال تم إصلاحها وأهم المشاركات بالقسم  TRfei-121

أعطال تم إصلاحها وأهم المشاركات بالقسم  TR0gr-121

أعطال تم إصلاحها وأهم المشاركات بالقسم  111_104


Here I also want to tell, the visitors of this branch. Jigs for
Mikronasa also possible to read and sew EEPROM in the devices at
mikronase. One minus the firmware is obtained in text form a byte, but
can anyone amiss.

Nvm.rar


By Mikronas couple shemok.
And the documents
on the Genesis
.


أعطال تم إصلاحها وأهم المشاركات بالقسم  L111

أعطال تم إصلاحها وأهم المشاركات بالقسم  L210

أعطال تم إصلاحها وأهم المشاركات بالقسم  L310


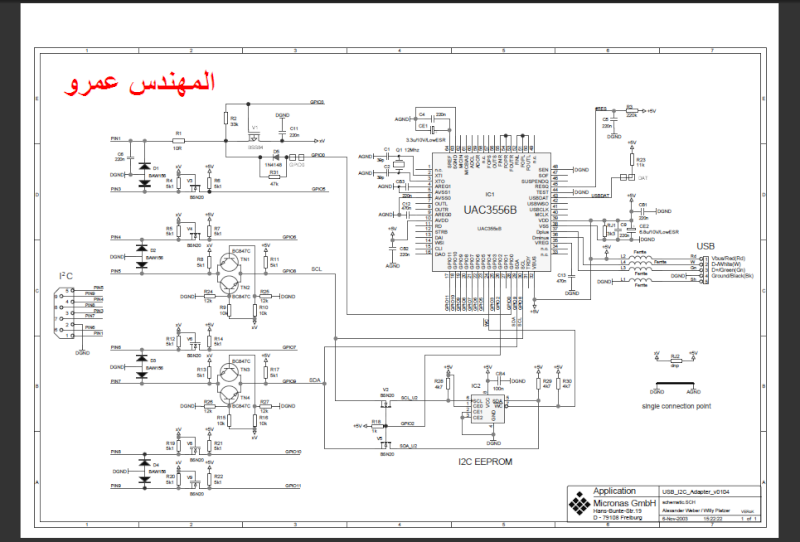
UsbDrv_Diagram.pdf


i2c-serie-e.pdf


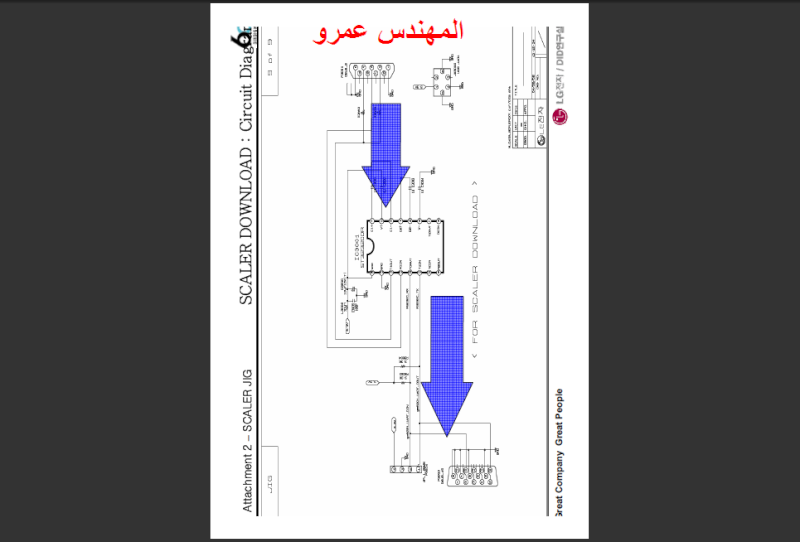
SCALER JIG.pdf


In monikovom Manuale from Samsung. As you have to
repair all that arm will fall even thought up to combine.

And at the expense of the controller, the commercial Projects can be
done if writing software for switching of internal circuits, that is to
make annealing on the same controller without everything else, I propose
to withdraw only the findings on switching, pressed a button -
including the withdrawal or two with inversion , pressed another -
including a different conclusion, and the first disconnected. In the
first case, more work for the programmer, for a lot longer I think, and
the second for a painter.


أعطال تم إصلاحها وأهم المشاركات بالقسم  S110


softjig SAMSUNG.pdf


https://eioe.forum.st

م/حسن المصري

م/حسن المصري
المدير العام


أعطال تم إصلاحها وأهم المشاركات بالقسم  Ss11

أعطال تم إصلاحها وأهم المشاركات بالقسم  Sss10

two jigs
for Micronas, one under the LPT, USB dugaya under the program
Flash_writer tool


]i2c-serie-e.rar


UsbDrv_Diagram.rar

https://eioe.forum.st

ahmedyounes

ahmedyounes
عضو نفتخر به


سلمت يداك
أعطال تم إصلاحها وأهم المشاركات بالقسم  506328

الرجوع الى أعلى الصفحة  رسالة [صفحة 1 من اصل 1]

صلاحيات هذا المنتدى:
لاتستطيع الرد على المواضيع في هذا المنتدى